ByteBuf 是对 JDK 提供的 java.nio.ByteBuffer 的进一步封装,提供了许多更加方便使用的功能,封装了操作 ByteBuffer 的复杂度。本文介绍 ByteBuf 的工作原理以及其部分实现类的源码分析,并对一些 ByteBuf 的辅助类也进行了简要介绍。
ByteBuf功能说明
在处理数据传输过程中,需要用到 JDK NIO 类库提供的java.nio.Buffer,它的实现如下图
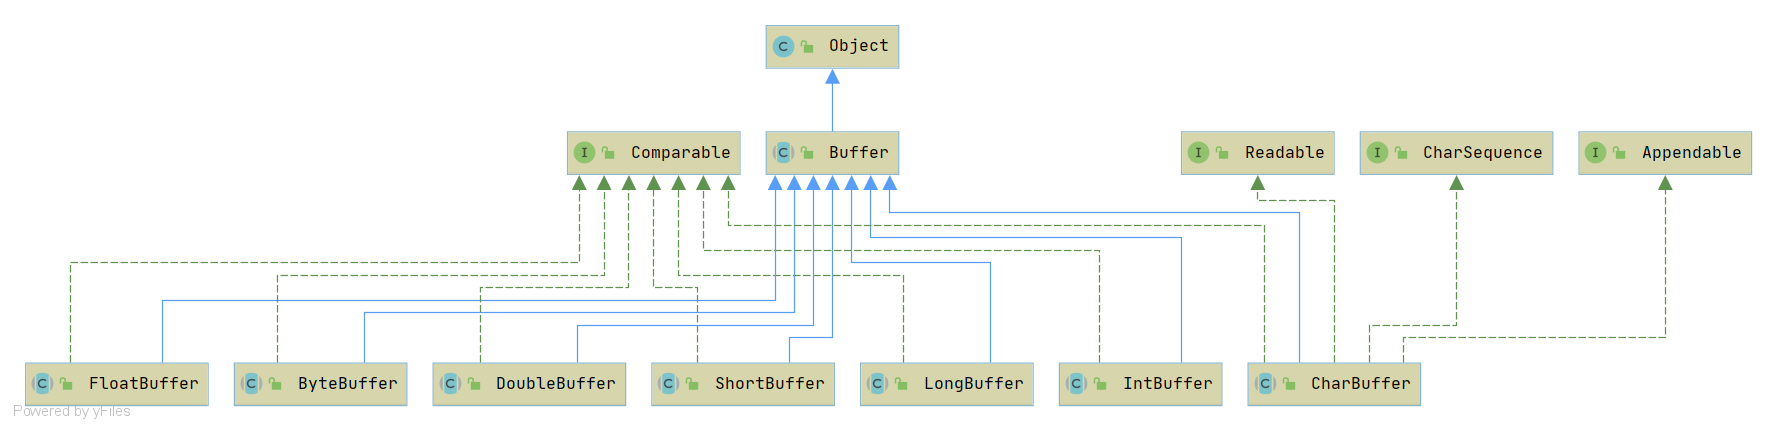
但对于 NIO 编程来说,ByteBuffer完全可以满足处理数据的需要,但是由于NIO编程的复杂性, ByteBuffer 也有其局限性,它的主要缺点如下:
- ByteBuffer 长度固定,一旦分配完成,它的容量不能动态扩展和收缩,当需要编码的 POJO 对象大于 ByteBuffer 的容量时,会发生索引越界异常
- ByteBuffer 只有一个标识位置的指针 position,读写的时候需要手工调用 flip 和 rewind 等,使用者必须小心谨慎地处理这些 API,否则很容易导致程序处理失败
- ByteBuffer 的 APl 功能有限,一些高级和实用的特性它不支持,需要使用者自己编程实现
因此,Netty 提供了自己的 ByteBuffer 实现 —— ByteBuf
ByteBuf工作原理
Sequential Access Indexing
Segment
ByteBuf provides two pointer variables to support sequential read and write operations. The two pointers segment a buffer into three areas.
+-------------------+------------------+------------------+
| discardable bytes |  readable bytes  |  writable bytes  |
|                   |     (CONTENT)    |                  |
+-------------------+------------------+------------------+
|                   |                  |                  |
0      <=      readerIndex   <=   writerIndex    <=    capacity
Reclaim unused area
The point is the management of discardable bytes. The read bytes can be discarded by calling discardReadBytes to reclaim unused area as depicted by the following diagram
BEFORE discardReadBytes()

              +-------------------+------------------+------------------+
              | discardable bytes |  readable bytes  |  writable bytes  |
              +-------------------+------------------+------------------+
              |                   |                  |                  |
              0      <=      readerIndex   <=   writerIndex    <=    capacity

AFTER discardReadBytes()

              +------------------+--------------------------------------+
              |  readable bytes  |    writable bytes (got more space)   |
              +------------------+--------------------------------------+
              |                  |                                      |
         readerIndex (0) <= writerIndex (decreased)        <=        capacity
Please note that there is no guarantee about the content of writable bytes after calling discardReadBytes. The writable bytes will not be moved in most cases and could even be filled with completely different data depending on the underlying buffer implementation.
For the special touch (Particularly necessary to point out that), calling discardReadBytes() can give rise to memory duplication which affect application performance. So you must balance the advantage and disadvantage before use.
Clearing the buffer indexes
Note: This operation doesn’t clear the buffer content but just change the two pointers’ position.
BEFORE clear()

              +-------------------+------------------+------------------+
              | discardable bytes |  readable bytes  |  writable bytes  |
              +-------------------+------------------+------------------+
              |                   |                  |                  |
              0      <=      readerIndex   <=   writerIndex    <=    capacity


AFTER clear()

              +---------------------------------------------------------+
              |             writable bytes (got more space)             |
              +---------------------------------------------------------+
              |                                                         |
              0 = readerIndex = writerIndex            <=            capacity
Search operations
//return the index of the first occurrence if found between readerIndex and writerIndex
int bytesBefore(int index, int length, byte value);
//return the index of the first occurrence if found in buffer
int indexOf(int fromIndex, int toIndex, byte value);
Mark and reset
For a ByteBuf, there are two marker indexes in it. One is for storing readerIndex and the other is for storing writerIndex. You can reposition current readerIndex or writerIndex to the marked by calling reset.
public abstract ByteBuf markReaderIndex();

public abstract ByteBuf resetReaderIndex();

public abstract ByteBuf markWriterIndex();

public abstract ByteBuf resetWriterIndex();
Derived buffers
You can create a view of an existing buffer by calling either duplicate(), slice() or slice(int, int). A derived buffer will have an independent readerIndex, writerIndex and marker indexes, while it shares other internal data representation, just like a NIO buffer does.
In case a completely fresh copy of an existing buffer is required, please call copy() method instead.
Conversion to existing JDK types
You can convert ByteBuf to array or ByteBuffer. It is better to check the existence of the corresponding type by calling hasArray or nioBufferCount if you determine to do it.
I/O Streams
You can process I/O streams by refering it to ByteBufInputStream and ByteBufOutputStream
Increase capacity dynamically
Netty encapsulate the operation of writing which is supported by java.nio package. Before executing base implementation of writing operation, it always check the capacity of current buffer and extend it if necessary.
@Override
public ByteBuf ensureWritable(int minWritableBytes) {
    if (minWritableBytes < 0) {
        throw new IllegalArgumentException(String.format(
                "minWritableBytes: %d (expected: >= 0)", minWritableBytes));
    }

    if (minWritableBytes <= writableBytes()) {
        return this;
    }

    if (minWritableBytes > maxCapacity - writerIndex) {
        throw new IndexOutOfBoundsException(String.format(
                "writerIndex(%d) + minWritableBytes(%d) exceeds maxCapacity(%d): %s",
                writerIndex, minWritableBytes, maxCapacity, this));
    }

    // Normalize the current capacity to the power of 2.
    int newCapacity = calculateNewCapacity(writerIndex + minWritableBytes);

    // Adjust to the new capacity.
    capacity(newCapacity);
    return this;
}
ByteBuf源码分析
ByteBuf主要类继承关系
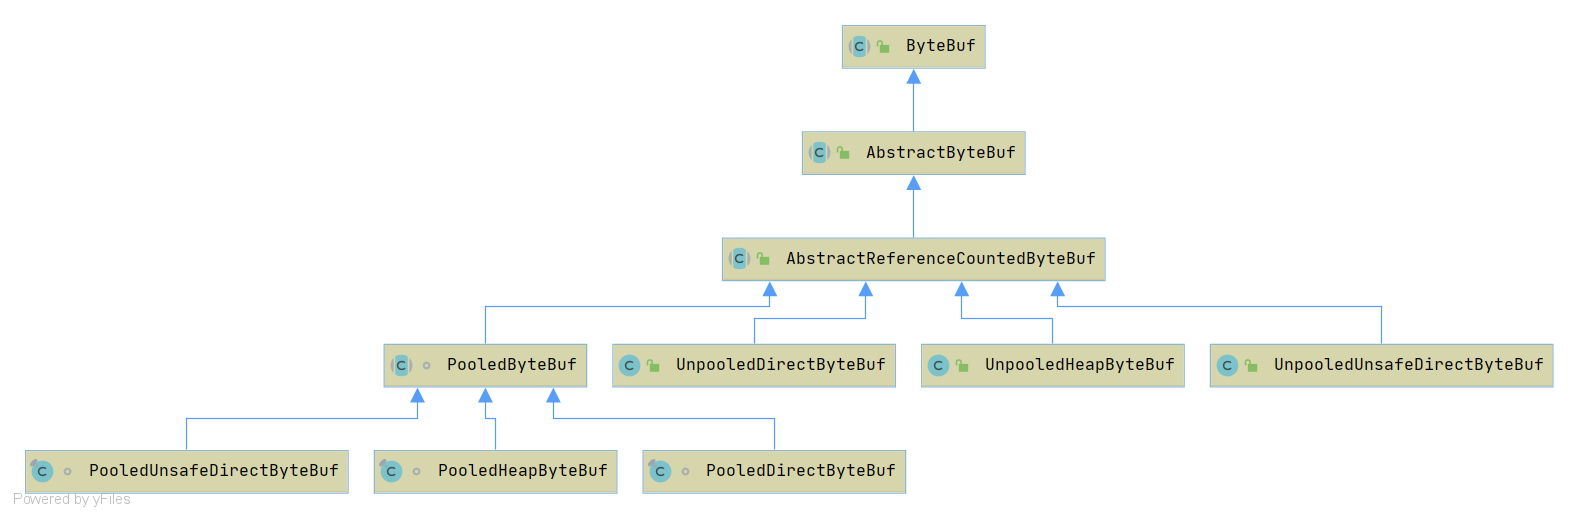
从内存分配的角度看,ByteBuf 可以分为两类。
- 堆内存( HeapByteBuf )字节缓冲区:特点是内存的分配和回收速度快,可以被JVM自动回收;缺点就是如果进行 Socket 的 I/O读写,需要额外做一次内存复制,将堆内存对应的缓冲区复制到内核 Channel 中,性能会有一定程度的下降。一般在后端业务消息的编解码模块
- 直接内存( DirectByteBuf )字节缓冲区:非堆内存,它在堆外进行内存分配,相比于堆内存,它的分配和回收速度会慢一些,但是将它写入或者从 SocketChannel 中读取时,由于少了一次内存复制,速度比堆内存快。一般在通信线程的读写缓冲区使用
从内存回收角度看, ByteBuf 也分为两类:基于对象池的 ByteBuf 和普通 ByteBuf。
两者的主要区别就是基于对象池的 ByteBuf 可以重用 ByteBuf 对象,它自己维护了一个内存池,可以循环利用创建的 ByteBuf,提升内存的使用效率,降低由于高负载导致的频繁 GC。测试表明使用内存池后的 Netty 在高负载、大并发的冲击下内存和 GC 更加平稳。
AbstractByteBuf源码分析
成员变量
static final ResourceLeakDetector<ByteBuf> leakDetector = new ResourceLeakDetector<ByteBuf>(ByteBuf.class);

//读写标记和记号
int readerIndex;
private int writerIndex;
private int markedReaderIndex;
private int markedWriterIndex;
//最大容量
private int maxCapacity;

private SwappedByteBuf swappedBuf;
在这里没有定义 ByteBuf 缓冲区实现是因为当下还并不清楚子类是基于堆内存还是直接内存。但无论子类如何实现 ByteBuf,他们的功能都是相同的,公共化的功能由父类实现,差异化的功能由子类实现。
读操作簇
以下是涉及到的读操作:
readByte、readBoolean、readUnsignedByte、readShort、readUnsignedShort、readMedium、readUnsignedMedium、readInt、readUnsignedInt、readLong、readChar、readFloat、readDouble、readBytes、readSlice
他们涉及到了各个类型,但读取流程是相同的。以 readBytes 为例
@Override
public ByteBuf readBytes(ByteBuf dst, int dstIndex, int length) {
    //对缓冲区的可用空间进行校验
    checkReadableBytes(length);
    //从当前的读索引开始,复制length个字节到目标byte数组中
    //由于不同的子类复制操作的技术实现细节不同,因此该方法由子类实现
    getBytes(readerIndex, dst, dstIndex, length);
    //读取成功索引递增
    readerIndex += length;
    return this;
}
写操作簇
以下是涉及到的写操作:
writeBoolean、writeByte、writeShort、writeMedium、writeInt、writeLong、writeChar、writeFloat、writeDouble、writeBytes、writeZero
他们涉及到了各个类型,但读取流程是相同的。以 writeBytes 为例
@Override
public ByteBuf writeBytes(ByteBuf src, int srcIndex, int length) {
    //对缓冲区的可用空间进行校验,空间不足时最多可以动态扩展到最大可写字节数
    ensureWritable(length);
    setBytes(writerIndex, src, srcIndex, length);
    writerIndex += length;
    return this;
}
@Override
public ByteBuf ensureWritable(int minWritableBytes) {
//省略对边界条件的校验判断代码
...
// Normalize the current capacity to the power of 2.
int newCapacity = calculateNewCapacity(writerIndex + minWritableBytes);
// Adjust to the new capacity.
capacity(newCapacity);
return this;
}对于 ByteBuffer 的一个最大的缺点就是一旦完成分配之后不能动态调整其容量。
由于很多场景下我们无法预先判断需要编码和解码的 POJO 对象长度,因此只能根据经验数据给个估计值。如果这个值偏大,就会导致内存的浪费;如果这个值偏小,遇到大消息编码的时候就会发生缓冲区溢出异常使用者需要自己捕获这个异常,并重新计算缓冲区的大小,将原来的内容复制到新的缓冲区中,然后重置指针。
这种处理策略对用户非常不友好,而且稍有不慎,就会引入新的问题。Netty 的 ByteBuf 可以动态扩展,为了保证安全性,允许使用者指定最大的容量,在容量范围内,可以先分配个较小的初始容量,后面不够用再动态扩展,这样可以达到功能和性能的最优组合。
接下来看一下计算方式
private int calculateNewCapacity(int minNewCapacity) {
    final int maxCapacity = this.maxCapacity;
    final int threshold = 1048576 * 4; // 4 MiB page

    if (minNewCapacity == threshold) {
        return threshold;
    }

    // If over threshold, do not double but just increase by threshold.
    if (minNewCapacity > threshold) {
        int newCapacity = minNewCapacity / threshold * threshold;
        if (newCapacity > maxCapacity - threshold) {
            newCapacity = maxCapacity;
        } else {
            newCapacity += threshold;
        }
        return newCapacity;
    }

    // Not over threshold. Double up to 4 MiB, starting from 64.
    int newCapacity = 64;
    while (newCapacity < minNewCapacity) {
        newCapacity <<= 1;
    }

    return Math.min(newCapacity, maxCapacity);
}
如果扩容后的新容量小于阈值,则以 64 为计数进行倍增,直到倍增后的结果大于或等于需要的容量值。
采用倍增或者步进算法的原因如下:如果以 minNewCapacity 作为目标容量,则本次扩容后的可写字节数刚好够本次写入使用。写入完成后,它的可写字节数会变为0,下次做写入操作的时候,需要再次动态扩张。这样就会形成第一次动态扩张后,每次写入操作都会进行动态扩张,由于动态扩张需要进行内存复制,频繁的内存复制会导致性能下降。
采用先倍增后步进的原因如下:当内存比较小的情况下,倍增操作并不会带来太多的内存浪费,例如 64字节 —> 128字节 —> 256字节,这样的内存扩张方式对于大多数应用系统是可以接受的。但是,当内存增长到一定阈值后,再进行倍增就可能会带来额外的内存浪费,例如 10MB,采用倍增后变为 20MB。但很有可能系统只需要 12MB,则扩张到 20MB 后会带来 8MB 的内存浪费。由于每个客户端连接都可能维护自己独立的接收和发送缓冲区,这样随着客户读的线性增长,内存浪费也会成比例地增加,因此,达到某个阈值后就需要以步进的方式对内存进行平滑的扩张。
这个阈值是个经验值,不同的应用场景,这个值可能不同,此处, ByteBuf 取值为4MB。
重新计算完动态扩张后的目标容量后,需要重新创建个新的缓冲区,将原缓冲区的内容复制到新创建的 ByteBuf 中,最后设置读写索引和 mark 标签等。由于不同的子类会对应不同的复制操作,所以该方法依然是个抽象方法,由子类负责实现。
操作索引
直接设置索引值即可,如同使用 setter 方法
重用缓冲区
将可读数据拷贝到缓冲区起始位置,并根据 Sequential Access Indexing 介绍的原理来计算指针位置和标记位置
Skip Bytes
后移读指针
AbstractReferenceCountedBuf源码分析
从类的名字就可以看出该类主要是对引用进行计数,类似于JVM内存回收的对象引用计数器,用于跟踪对象的分配和销毁,做自动内存回收。
成员变量
//原子操作对成员变量进行更新,以实现线程安全,消除锁
private static final AtomicIntegerFieldUpdater<AbstractReferenceCountedByteBuf> refCntUpdater =
        AtomicIntegerFieldUpdater.newUpdater(AbstractReferenceCountedByteBuf.class, "refCnt");

//用于标识refcnt字段在AbstractReferenceCountedByteBuf中的内存地址
//该内存地址的获取是JDK实现强相关的,如果使用SUN的JDK,它通过sun.misc.Unsafe的objectFieldoffset
//接口来获得,ByteBuf的实现子类UnpooledUnsafeDirectBuf和PooledUnsafeDirectByteBuf
//会使用到这个偏移量。
private static final long REFCNT_FIELD_OFFSET;

static {
    long refCntFieldOffset = -1;
    try {
        if (PlatformDependent.hasUnsafe()) {
            refCntFieldOffset = PlatformDependent.objectFieldOffset(
                    AbstractReferenceCountedByteBuf.class.getDeclaredField("refCnt"));
        }
    } catch (Throwable t) {
        // Ignored
    }

    REFCNT_FIELD_OFFSET = refCntFieldOffset;
}

//跟踪对象的引用次数
@SuppressWarnings("FieldMayBeFinal")
private volatile int refCnt = 1;
对象引用计数器
每调用一次 retain 方法,引用计数器就会加一,由于可能存在多线程并发调用的场景,所以它的累加操作必须是线程安全的
//调用方法引用计数器加一
@Override
public ByteBuf retain() {
    for (;;) {
        int refCnt = this.refCnt;
        if (refCnt == 0) {
            throw new IllegalReferenceCountException(0, 1);
        }
        if (refCnt == Integer.MAX_VALUE) {
            throw new IllegalReferenceCountException(Integer.MAX_VALUE, 1);
        }
        if (refCntUpdater.compareAndSet(this, refCnt, refCnt + 1)) {
            break;
        }
    }
    return this;
}
通过自旋对引用计数器进行加一操作,由于引用计数器的初始值为1,如果申请和释放操作能够保证正确使用,则它的最小值为1。当被释放和被申请的次数相等时,就调用回收方法回收当前的 ByteBuf 对象。如果为0,说明对象被意外、错误地引用,抛出 IllegalReferenceCountException。如果引用计数器达到整型数的最大值,抛出引用越界的异常 IllegalReferenceCountException。最后通过 compareAndSet 进行原子更新,它会使用自己获取的值跟期望值进行对比。如果其间已经被其他线程修改了,则比对失败,进行自旋,重新获取引用计数器的值再次比对;如果比对成功则对其加一。
与 retain 方法类似,release 方法也是在一个自旋循环里面进行判断和更新的。需要注意的是:当refCnt==1时意味着申请和释放相等,说明对象引用已经不可达,该对象需要被释放和垃圾回收掉,则通过调用 deallocate 方法来释放 ByteBuf 对象。
//调用方法引用计数器减一
@Override
public final boolean release() {
    for (;;) {
        int refCnt = this.refCnt;
        if (refCnt == 0) {
            throw new IllegalReferenceCountException(0, -1);
        }

        if (refCntUpdater.compareAndSet(this, refCnt, refCnt - 1)) {
            if (refCnt == 1) {
                deallocate();
                return true;
            }
            return false;
        }
    }
}
UnpooledHeapByteBuf源码分析
UnpooledHeapByteBuf 是基于堆内存进行内存分配的字节缓冲区,它没有基于对象池技术实现,这就意味着每次IO的读写都会创建一个新的 UnpooledHeapByteBuf,频繁进行大块内存的分配和回收对性能会造成一定影响,但是相比于堆外内存的申请和释放,它的成本还是会低一些相比于 PooledHeapByteBuf,UnpooledHeapByteBuf 的实现原理更加简单,也不容易出现内存管理方面的问题,因此在满足性能的情况下,推荐使用 UnpooledHeapByteBuf。
成员变量
//聚合了一个ByteBufAllocator,用于UnpooledHeapByteBuf的内存分配
private final ByteBufAllocator alloc;
//定义了一个byte数组作为缓冲区 -- ByteBuffer底层同样是byte数组实现缓冲区
private byte[] array;
//定义了一个ByteBuffer类型的tmpNioBuf变量用于实现NettyByteBuf到JDK NIO ByteBuffer的转换。
private ByteBuffer tmpNioBuf;
动态扩展缓冲区
在介绍 AbstractByteBuf 的时候,ByteBuf 在最大容量范围内能够实现自动扩张,下面我们一起看下缓冲区的自动扩展在子类 UnpooledHeapByteBuf 中的实现。
@Override
public ByteBuf capacity(int newCapacity) {
    //对新容量进行合法性校验
    ensureAccessible();
    if (newCapacity < 0 || newCapacity > maxCapacity()) {
        throw new IllegalArgumentException("newCapacity: " + newCapacity);
    }

    int oldCapacity = array.length;
    //判断是否需要动态扩展
    if (newCapacity > oldCapacity) {
        byte[] newArray = new byte[newCapacity];
        System.arraycopy(array, 0, newArray, 0, array.length);
        setArray(newArray);
    } else if (newCapacity < oldCapacity) {
        //创建新数组
        byte[] newArray = new byte[newCapacity];
        int readerIndex = readerIndex();
        if (readerIndex < newCapacity) {
            int writerIndex = writerIndex();
            if (writerIndex > newCapacity) {
                writerIndex(writerIndex = newCapacity);
            }
            System.arraycopy(array, readerIndex, newArray, readerIndex, writerIndex - readerIndex);
        } else {
            setIndex(newCapacity, newCapacity);
        }
        //替换旧数组
        setArray(newArray);
    }
    return this;
}
需要指出的是, ByteBuf 以 set 和 get 开头读写缓冲区的方法并不会修改读写索引。
转换成 JDK ByteBuffer
@Override
public ByteBuffer nioBuffer(int index, int length) {
    //参数合法性校验
    ensureAccessible();
    //wrap将数组引用包装为ByteBuf,无论哪一方修改都会同步到另一方
    //slice创建当前ByteBuf的视图:数据共享、索引初始化(防止同时操作ByteBuf造成的游标混乱)
    return ByteBuffer.wrap(array, index, length).slice();
}
PooledByteBuf 源码分析
PooledByteBuf 基于内存池实现,与 UnPooledDirectByteBuf 的唯一不同就是缓冲区的分配是销毁策略不同,其他功能都是等同的,也就是说,两者唯一的不同就是内存分配策略不同。
详细内容请阅读 《Netty 内存池优化原理》
PooledDirectByteBuf源码分析
创建字节缓冲区
实例由于采用内存池实现,所以新创建 PooledDirectByteBuf 对象时不能直接 new 一个实例,而是从内存池中获取,然后设置引用计数器的值。
static PooledDirectByteBuf newInstance(int maxCapacity) {
    PooledDirectByteBuf buf = RECYCLER.get();
    buf.setRefCnt(1);
    buf.maxCapacity(maxCapacity);
    return buf;
}直接从内存池Recycler<PooledDirectByteBuf>中获取PooledDirectByteBuf对象,然后设置它的引用计数器为1,设置缓冲区最大容量后返回。
复制新的字节缓冲区实例
复制一个新的独立的 PooledDirectByteBuf 实例
@Override
public ByteBuf copy(int index, int length) {
    //参数合法性校验
    checkIndex(index, length);
    ByteBuf copy = alloc().directBuffer(length, maxCapacity());
    copy.writeBytes(this, index, length);
    return copy;
}
首先对索引和长度进行合法性校验,通过之后调用 PooledByteBufAllocator 分配一个新的 ByteBuf,由于 PooledByteBufAllocator 没有实现 directBuffer 方法,所以最终会调用到 AbstractByteBufAllocator 的 directBuffer 方法。
@Override
public ByteBuf directBuffer(int initialCapacity, int maxCapacity) {
    if (initialCapacity == 0 && maxCapacity == 0) {
        return emptyBuf;
    }
    validate(initialCapacity, maxCapacity);
    return newDirectBuffer(initialCapacity, maxCapacity);
}
newDirectBuffer 方法对于不同的子类有不同的实现策略,如果是基于内存池的分配器,它会从内存池中获取可用的 ByteBuf,如果是非池,则直接创建新的 ByteBuf。
//基于内存池的缓冲区分配
@Override
protected ByteBuf newDirectBuffer(int initialCapacity, int maxCapacity) {
    PoolThreadCache cache = threadCache.get();
    PoolArena<ByteBuffer> directArena = cache.directArena;

    ByteBuf buf;
    if (directArena != null) {
        buf = directArena.allocate(cache, initialCapacity, maxCapacity);
    } else {
        if (PlatformDependent.hasUnsafe()) {
            buf = new UnpooledUnsafeDirectByteBuf(this, initialCapacity, maxCapacity);
        } else {
            buf = new UnpooledDirectByteBuf(this, initialCapacity, maxCapacity);
        }
    }

    return toLeakAwareBuffer(buf);
}
//非内存池实现直接创建新的缓冲区
@Override
protected ByteBuf newDirectBuffer(int initialCapacity, int maxCapacity) {
ByteBuf buf;
if (PlatformDependent.hasUnsafe()) {
buf = new UnpooledUnsafeDirectByteBuf(this, initialCapacity, maxCapacity);
} else {
buf = new UnpooledDirectByteBuf(this, initialCapacity, maxCapacity);
}
return toLeakAwareBuffer(buf);
}ByteBuf辅助类介绍
ByteBufHolder
ByteBufHolder 是 ByteBuf 的容器,在 Netty 中,它非常有用。例如 HTTP 协议的请求消息和应答消息都可以携带消息体,这个消息体在 NIO ByteBuffer 中就是个 ByteBuffer 对象,在 Netty 中就是 ByteBuf 对象。由于不同的协议消息体可以包含不同的协议字段和功能,因此,需要对 ByteBuf 进行包装和抽象,不同的子类可以有不同的实现。
为了满足这些定制化的需求,Netty 抽象出了 ByteBufHolder 对象,它包含了一个 ByteBuf,另外还提供了一些其他实用的方法,使用者继承 ByteBufHolder 接口后可以按需封装自己的实现。
下图是相关类库的继承关系(部分)

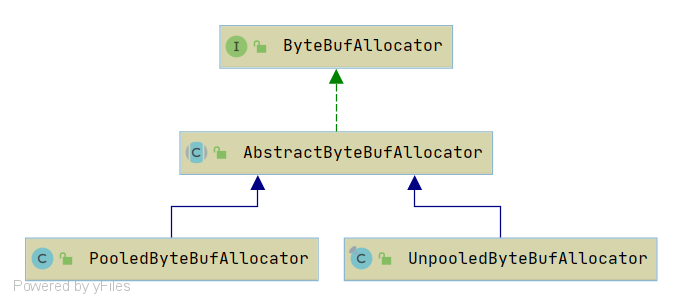
ByteBufAllocator
ByteBufAllocator 是字节缓冲区分配器,按照 Netty 的缓冲区实现不同,共有两种不同的分配器:基于内存池的字节缓冲区分配器和普通的字节缓冲区分配器。
下图为ByteBufAllocator的继承关系
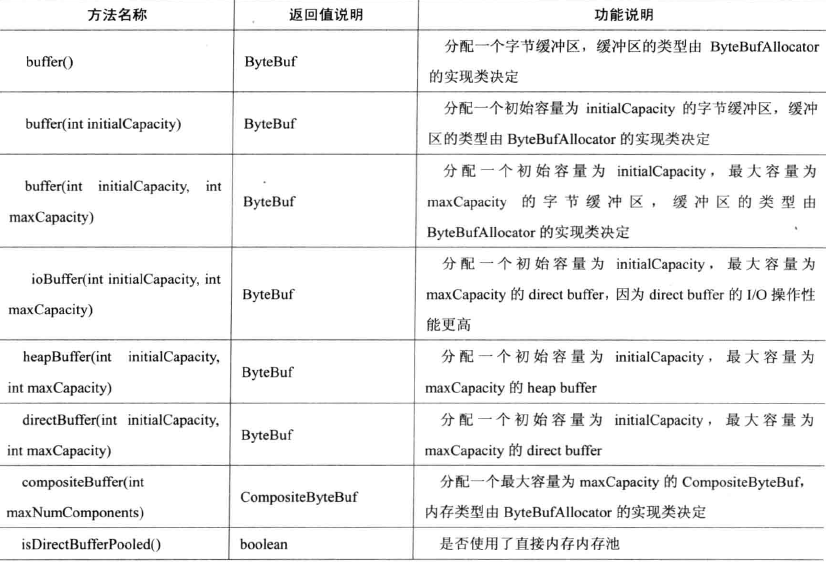
下图为ByteBufAllocator主要API
CompositeByteBuf
CompositeByteBuf 允许将多个 ByteBuf 的实例组装到一起,形成一个统一的视图,有点类似于数据库将多个表的字段组装到一起统一用视图展示。
CompositeByteBuf在一些场景下非常有用,例如某个协议 POJO 对象包含两部分;消息头和消息体,它们都是 ByteBuf 对象。当需要对消息进行编码的时候需要进行整合,如果使用 JDK 的默认能力,有以下两种方式
- 将某个 ByteBuffer 复制到另一个 ByteBuffer 中,或者创建一个新的 ByteBuffer 将两者复制到新建的 ByteBuffer 中
- 通过 List 或数组等容器,将消息头和消息体放到容器中进行统一维护和处理
上面的做法非常别扭,实际上我们遇到的问题跟数据库中视图解决的问题一致——缓冲区有多个,但是需要统一展示和处理,必须有存放它们的统一容器。为了解决这个问题,Netty 提供了 CompositeByteBuf
下面粗浅的介绍一下原理
public class CompositeByteBuf extends AbstractReferenceCountedByteBuf {

    private final ResourceLeak leak;
    private final ByteBufAllocator alloc;
    private final boolean direct;
    //定义了一个Component类型的集合,实际上Component就是ByteBuf的包装实现类
    //Component包装了ByteBuf对象,维护了在集合中的位置偏移量信息等
    private final List<Component> components = new ArrayList<Component>();
    private final int maxNumComponents;
    private static final ByteBuffer FULL_BYTEBUFFER = (ByteBuffer) ByteBuffer.allocate(1).position(1);

    private boolean freed;
private final class Component {
final ByteBuf buf;
final int length;
int offset;
int endOffset;新增Component
public CompositeByteBuf addComponent(ByteBuf buffer) {
    addComponent0(components.size(), buffer);
    consolidateIfNeeded();
    return this;
}
删除Component(需要更新各个Component的索引偏移量)
public CompositeByteBuf removeComponent(int cIndex) {
    checkComponentIndex(cIndex);
    components.remove(cIndex).freeIfNecessary();
    updateComponentOffsets(cIndex);
    return this;
}
ByteBufUtil
ByteBufUtil 是一个非常有用的工具类,它提供了一系列静态方法用于操作 ByteBuf 对象。
其中方法包括:hexDump、hashCode、equals、compare、indexOf、swapShort、swapMedium、swapInt、swapLong、readBytes、encodeString、decodeString
//对需要编码的字符串src按照指定的字符集charset进行编码
//利用指定的ByteBufAllocator生成一个新的ByteBuf;
ByteBuf encodeString(ByteBufAllocator alloc, CharBuffer src, Charset charset);
//使用指定的ByteBuffer和charset进行对ByteBuffer进行解码,获取解码后的字符串
String decodeString(ByteBuffer src, Charset charset);
//将参数ByteBuf的内容以十六进制字符串的方式打印出来
//用于输出日志或者打印码流,方便问题定位,提升系统的可维护性。
String hexDump(ByteBuf buffer);