Spring 类型转换框架经过了几个版本的演进,由 PropertyEditor Framework 转变为 Converter Framework + Formatter Framework 的形式,其为 SpringMVC 的字段转换提供了丰富的功能,保证了在 Web 字段处理的安全、高效进行。
类型转换接口演进
类型转换接口:PropertyEditor
Spring 3.0 前的 PropertyEditor,基于 Java Bean 接口 java.beans.PropertyEditor 并全部继承自 PropertyEditorSupport。
基于 PropertyEditor 的类型转换作为一种古老的、遗留下来的方式,是具有一些设计缺陷的,如:职责不单一,类型不安全,只能实现 String 类型的转换等。虽然自 Spring 3.0 起提供了现代化的类型转换接口,但是此部分机制一直得以保留,保证了向下兼容性。
类型转换接口:Converter
为了解决 PropertyEditor 作为类型转换方式的设计缺陷,Spring 3.0 版本重新设计了一套类型转换接口,其中主要包括:Converter<S, T>、ConverterFactory<S, R>、GenericConverter、ConditionalConverter。对于使用者而言,如果做个类型转换需要了解到这三套体系无疑成本太高,因此就有了 ConversionService 用于统一化底层类型转换实现的差异,对外提供统一服务。
它主要有两大实现:
- GenericConversionService:提供模版实现,如转换器的注册、删除、匹配查找等,但并不内置转换器实现
- DefaultConversionService:继承自 GenericConversionService。在它基础上默认注册了非常多的内建的转换器实现,从而能够实现绝大部分的类型转换需求
ConversionService 转换服务它贯穿于 Spring 上下文 ApplicationContext 的多项功能,包括但不限于:BeanWrapper 处理 Bean 属性、DataBinder 数据绑定、PropertySource 外部化属性处理等等。
类型转换格式化接口:Formatter
Spring 3.0 新增了一个 Formatter<T> 接口,作用为:将 Object 格式化为类型 T。从语义上理解它也具有类型转换(数据转换的作用),相较于 Converter<S,T> 它强调的是格式化,因此一般用于时间/日期、数字(小数、分数、科学计数法等等)、货币等场景,举例它的实现:
DurationFormatter:字符串和Duration类型的互转CurrencyUnitFormatter:字符串和javax.money.CurrencyUnit货币类型互转DateFormatter:字符串和java.util.Date类型互转。- ……
为了和类型转换服务 ConversionService 完成整合,对外只提供统一的 API。Spring 提供了 FormattingConversionService 专门用于整合 Converter 和 Formatter,从而使得两者具有一致的编程体验,对开发者更加友好。
类型转换底层接口 TypeConvert
定义类型转换方法的接口,它在 Spring 2.0 就已经存在。在还没有 ConversionService 之前,它的类型转换动作均委托给已注册的 PropertyEditor 来完成。但自 3.0 之后,这个转换动作可能被 PropertyEditor 来做,也可能交给 ConversionService 处理。
public interface TypeConverter {
    <T> T convertIfNecessary(Object value, Class<T> requiredType) throws TypeMismatchException;
    // methodParam:转换的目标方法参数,主要为了分析泛型类型,可能为 null
    <T> T convertIfNecessary(Object value, Class<T> requiredType, MethodParameter methodParam) throws TypeMismatchException;
    // field:目标的反射字段,为了泛型,可能为 null
    <T> T convertIfNecessary(Object value, Class<T> requiredType, Field field) throws TypeMismatchException;
}
它是 Spring 内部使用类型转换的入口,最终委托给 PropertyEditor 或者注册到 ConversionService 里的转换器去完成。它的主要实现有:TypeConverterSupport,其继承自 PropertyEditorRegistrySupport,主要是为子类 BeanWrapperImpl 提供功能支撑。
作用有如下两方面:
- 提供对默认编辑器(支持 JDK 内置类型的转换如:Charset、Class、Class[]、Properties、Collection 等等)和自定义编辑器的管理(PropertyEditorRegistry#registerCustomEditor)
- 提供 get/set 方法,把
ConversionService管理上(可选依赖,可为 null)
数据绑定相关:因为数据绑定强依赖于类型转换,因此数据绑定涉及到的属性访问操作将会依赖于此组件,不管是直接访问属性的 DirectFieldAccessor 还是功能更强大的 BeanWrapperImpl 均是如此。
总的来说,TypeConverter 能把类型的各种实现、API 收口于此,Spring 把类型转换的能力都转嫁到 TypeConverter 这个 API 里面去了。虽然方便了使用,但其内部实现原理稍显复杂。
PropertyEditor
PropertyEditor 位于 java.beans 包中,此接口提供的方法和本文类型转换有关的有以下四个接口:
void setValue(Object value); \\ 设置属性值
Object getValue(); \\ 获取属性值
String getAsText(); \\ 将属性值转换成String输出
void setAsText(String text); \\ 将String转换为属性值类型输入
JDK 对 PropertyEditor 接口提供了一个默认实现 java.beans.PropertyEditorSupport,因此我们若需扩展此接口,仅需继承此类,根据需要复写 getAsText/setAsText 这两个方法即可,Spring 无一例外都是这么做的。
注意:PropertyEditorSupport线程不安全
PropertyEditor 实现的是双向类型转换:String 和 Object 互转。调用 setValue() 方法后,需要先“缓存”起来后续才能够使用。PropertyEditorSupport 为此提供了一个成员属性来做:
PropertyEditorSupport:
  // 调用 setValue()赋值 getValue()取值
	private Object value;
这么一来 PropertyEditorSupport 就是有状态的了,因此是线程不安全的。在使用过程中需要特别注意,避免出现并发风险。Spring 内置的所有扩展均是基于 PropertyEditorSupport 来实现的,因此也都是线程不安全的。
标准扩展实现
Spring 为了扩展自身功能,提高配置灵活性,扩展出了非常非常多的 PropertyEditor 实现,并把标准实现都放在 org.springframework.beans.propertyeditors 包下,下面是几个代表性 API。
| PropertyEditor | 功能 | 举例 |
|---|---|---|
| ZoneIdEditor | 转为java.time.ZoneId | Asia/Shanghai |
| URLEditor | 转为URL,支持传统方式 file:、http:,也支持 Spring 风格:classpath:、context上下文相对路径 等等 |
http://www.baidu.com |
| StringTrimmerEditor | trim()字符串,也可删除指定字符char | 任意字符串 |
| StringArrayPropertyEditor | 转为字符串数组 | A,B,C |
| PropertiesEditor | 转为 Properties | name = YourBatman |
| PatternEditor | 转为 Pattern | (\D*)(\d+)(.*) |
| PathEditor | 转为 java.nio.file.Path。支持传统 URL 和 Spring 风格的 url | classpath:xxx |
| ClassEditor | 转为 Class | 全类名 |
| CustomBooleanEditor | 转为Boolean | 对传入的 true、on、yes、1 等都会被“翻译”成 true,大大提高兼容性。 |
| CharsetEditor | 转为 Charset | |
| CustomDateEditor | 转为 java.util.Date | |
| … |
把没有放在
org.springframework.beans.propertyeditors包下的实现称作特殊实现
PropertyEditorRegistry 注册中心
它是管理PropertyEditor的中心接口,负责注册、查找对应的PropertyEditor。
public interface PropertyEditorRegistry {
  void registerCustomEditor(Class<?> requiredType, PropertyEditor propertyEditor);
  void registerCustomEditor(Class<?> requiredType, String propertyPath, PropertyEditor propertyEditor);
  PropertyEditor findCustomEditor(Class<?> requiredType, String propertyPath);
}
接口的继承关系如下:
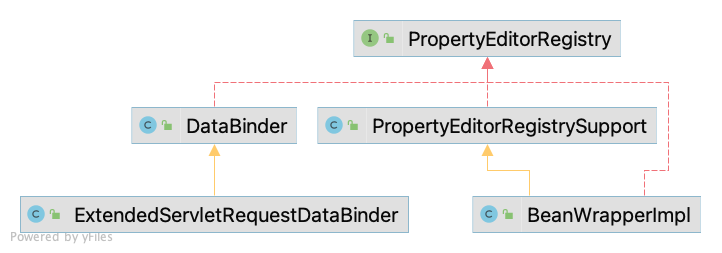
PropertyEditorRegistrySupport
它是 PropertyEditorRegistry 接口的实现,提供对 default editors 和 custom editors 的管理,最终主要为 BeanWrapperImpl 和 DataBinder 服务。
一般来说,Registry 注册中心内部会使用多个 Map 来维护组件间映射关系。此处也不例外:
// 装载【默认的】编辑器,初始化的时候会注册好
private Map<Class<?>, PropertyEditor> defaultEditors;
// 如果想覆盖掉【默认行为】,可通过此Map覆盖(比如处理Charset类型你不想用默认的编辑器处理)
// 通过API:overrideDefaultEditor(...)放进此Map里
private Map<Class<?>, PropertyEditor> overriddenDefaultEditors;

// ======================注册自定义的编辑器======================
// 通过API:registerCustomEditor(...)放进此Map里(若没指定propertyPath)
private Map<Class<?>, PropertyEditor> customEditors;
// 通过API:registerCustomEditor(...)放进此Map里(若指定了propertyPath)
private Map<String, CustomEditorHolder> customEditorsForPath;
customEditorCache 作用
private Map<Class<?>, PropertyEditor> customEditorCache;从属性名上理解,它表示customEditors属性的缓存,其用于缓存自定义的编辑器,辅以成员属性 customEditors 属性一起使用。唯一使用方式在私有方法:根据类型获取自定义编辑器PropertyEditorRegistrySupport#getCustomEditor
private PropertyEditor getCustomEditor(Class<?> requiredType) {
	if (requiredType == null || this.customEditors == null) {
		return null;
	}
	PropertyEditor editor = this.customEditors.get(requiredType);

	// 重点:若customEditors没有并不代表处理不了,因为还得考虑父子关系、接口关系
	if (editor == null) {
		// 去缓存里查询,是否存在父子类作为key的情况
		if (this.customEditorCache != null) {
			editor = this.customEditorCache.get(requiredType);
		}

		// 若缓存没命中,就得遍历customEditors了,时间复杂度为O(n)
		if (editor == null) {
			for (Iterator<Class<?>> it = this.customEditors.keySet().iterator(); it.hasNext() && editor == null;) {
				Class<?> key = it.next();
				if (key.isAssignableFrom(requiredType)) {
					editor = this.customEditors.get(key);
					if (this.customEditorCache == null) {
						this.customEditorCache = new HashMap<Class<?>, PropertyEditor>();
					}
					this.customEditorCache.put(requiredType, editor);
				}
			}
		}
	}
	return editor;
}
因为遍历 customEditors 属于比较重的操作(复杂度为 O(n)),从而使用了 customEditorCache 避免每次出现父子类的匹配情况就去遍历一次,大大提高匹配效率。
父子类匹配:即对于统一父类 Parent 有其对应的解析器 ParentPropertyEditor,但子类 Child 即使没有对应的解析器,也可被其父类的解析器解析成功。
注意:每次调用 API 向 customEditors 添加新元素时,customEditorCache 就会被清空,因此因尽量避免在运行期注册编辑器,以避免缓存失效而降低性能。
customEditors 与 customEditorsForPath 作用
customEditors 与 customEditorsForPath 是互斥的。customEditors 是粗粒度的 Editor,key 为类型,即对类型的转换全部交由此 Editor 处理,如 registerCustomEditor(UUID.class,new UUIDEditor())。而 customEditorsForPath 是细粒度的 Editor,key 为字段导航,仅能处理对应类型的指定字段。
字段导航:Person.bags[0].name 或 Person.name 的形式
有了这种区别,注册中心在findCustomEditor(requiredType,propertyPath)匹配的时候也是按照优先级顺序执行匹配的:
- 若指定了propertyPath(不为null),就先去
customEditorsForPath里找。否则就去customEditors里找 - 若没有指定 propertyPath(为null),就直接去
customEditors里找
PropertyEditorRegistrar
Registrar:登记员。它一般和 Registry 配合使用,其实内核还是 Registry,只是运用了倒排思想屏蔽一些内部实现。
public interface PropertyEditorRegistrar {
	void registerCustomEditors(PropertyEditorRegistry registry);
}
PropertyEditorRegistrar 接口在 Spring 体系内唯一实现为:ResourceEditorRegistrar。
ResourceEditorRegistrar
从命名上就知道它和 Resource 资源有关,其主要负责将 ResourceEditor 注册到注册中心里面去,用于处理形如 Resource、File、URI 等这些资源类型。
配置 classpath:xxx.xml 用来启动 Spring 容器的配置文件,String -> Resource 转换就是它的功能。
public ResourceEditorRegistrar(ResourceLoader resourceLoader, PropertyResolver propertyResolver) {
	this.resourceLoader = resourceLoader; // 一般传入ApplicationContext
	this.propertyResolver = propertyResolver; // 一般传入Environment
}
很明显,它的设计就是服务于 ApplicationContext 上下文,在 Bean 创建过程中辅助 BeanWrapper 实现资源加载、转换。BeanFactory 在初始化的准备过程中(prepareBeanFactory)将它实例化,从而具备资源处理能力。
Converter
PropertyEditor 设计缺陷
- 职责不单一:该接口有非常多的方法,但只用到 2 个而已
- 类型不安全:setValue() 方法入参是 Object,getValue() 返回值是Object,依赖于约定好的类型强转,不安全
- 线程不安全:依赖于 setValue() 后 getValue(),实例是线程不安全的
- 语义不清晰:从语义上根本不能知道它是用于类型转换的组件
- 只能用于 String 类型:它只能进行 String <-> 其它类型的转换,而非更灵活的 Object <-> Object
PropertyEditor 存在这五宗“罪”,让 Spring 决定自己设计一套全新 API 用于专门服务于类型转换,其包含 Converter、ConverterFactory、GenericConverter。
新一代类型转换 Converter
为了解决PropertyEditor作为类型转换方式的设计缺陷,Spring 3.0版本重新设计了一套类型转换接口,有3个核心接口:
Converter<S, T>:Source -> Target类型转换接口,适用于1:1转换ConverterFactory<S, R>:Source -> R类型转换接口,适用于1:N转换GenericConverter:更为通用的类型转换接口,适用于 N:N 转换
另外,还有一个条件接口 ConditionalConverter,可跟上面 3 个接口搭配组合使用,提供前置条件判断验证。
这套接口,解决了PropertyEditor做类型转换存在的所有缺陷,且具有非常高的灵活性和可扩展性。
Converter
将源类型 S 转换为目标类型 T。
public interface Converter<S, T> {
  T convert(S source);
}
Converter 用于解决 1:1 的任意类型转换,因此它必然存在一个不足:解决 1:N 转换问题需要写 N 遍,造成重复冗余代码。
ConverterFactory
将对象 S 转换为 R 的所有子类型,从而形成 1:N 的关系。
public interface ConverterFactory<S, R> {
	<T extends R> Converter<S, T> getConverter(Class<T> targetType);
}
既然有了 1:1、1:N,自然就有 N:N。比如集合转换、数组转换、Map 到 Map 的转换等等,这些 N:N 的场景,就需要借助下一个接口 GenericConverter 来实现。
GenericConverter
它是一个通用的转换接口,用于在两个或多个类型之间进行转换。相较于前两个,这是最灵活的 SPI 转换器接口,但也是最复杂的。
public interface GenericConverter {

  // 维护 N:N 的集合
	Set<ConvertiblePair> getConvertibleTypes();
	Object convert(Object source, TypeDescriptor sourceType, TypeDescriptor targetType);

	// 普通POJO
	final class ConvertiblePair {
		private final Class<?> sourceType;
		private final Class<?> targetType;
	}
}
GenericConverter的内置实现部分如下:
ConditionalGenericConverter 是 GenericConverter 和条件接口 ConditionalConverter 的组合,作用是在执行 GenericConverter 转换时增加一个前置条件判断方法。
| 转换器 | 描述 | 示例 |
|---|---|---|
| ArrayToArrayConverter | 数组转数组Object[] -> Object[] | [“1”,”2”] -> [1,2] |
| ArrayToCollectionConverter | 数组转集合 Object[] -> Collection | 同上 |
| CollectionToCollectionConverter | 数组转集合 Collection -> Collection | 同上 |
| StringToCollectionConverter | 字符串转集合String -> Collection | 1,2 -> [1,2] |
| StringToArrayConverter | 字符串转数组String -> Array | 同上 |
| MapToMapConverter | Map -> Map(需特别注意:key和value都支持转换才行) | 略 |
| CollectionToStringConverter | 集合转字符串Collection -> String | [1,2] -> 1,2 |
| ArrayToStringConverter | 委托给CollectionToStringConverter完成 | 同上 |
-- |
-- |
-- |
| StreamConverter | 集合/数组 <-> Stream互转 |
集合/数组类型 -> Stream类型 |
| IdToEntityConverter | ID->Entity的转换 | 传入任意类型ID -> 一个Entity实例 |
| ObjectToObjectConverter | 很复杂的对象转换,任意对象之间 | obj -> obj |
| FallbackObjectToStringConverter | 上个转换器的兜底,调用Obj.toString()转换 | obj -> String |
ConditionalConverter
ConditionalConverter 是条件接口,它可以为 Converter、GenericConverter、ConverterFactory 转换增加一个前置判断条件。
public interface ConditionalConverter {
	boolean matches(TypeDescriptor sourceType, TypeDescriptor targetType);
}
通用转换器 GenericConverter 大多都与它进行了组合实现。这也很容易理解,作为通用的转换器,加个前置判断将更加严谨和更安全。对于专用的转换器如 Converter,它已明确规定了转换的类型,自然就不需要做前置判断。
ConditionalGenericConverter 实现示例
以 CollectionToCollectionConverter 做示范:List<String> -> Set<Integer>
public void main() {
    ConditionalGenericConverter conditionalGenericConverter = new CollectionToCollectionConverter(new DefaultConversionService());

    // Console: [java.util.Collection -> java.util.Collection]
    System.out.println(conditionalGenericConverter.getConvertibleTypes());

    List<String> sourceList = Arrays.asList("1", "2", "2", "3", "4");
    TypeDescriptor sourceTypeDesp = TypeDescriptor.collection(List.class, TypeDescriptor.valueOf(String.class));
    TypeDescriptor targetTypeDesp = TypeDescriptor.collection(Set.class, TypeDescriptor.valueOf(Integer.class));

    // Console: true
    System.out.println(conditionalGenericConverter.matches(sourceTypeDesp, targetTypeDesp));

    Object convert = conditionalGenericConverter.convert(sourceList, sourceTypeDesp, targetTypeDesp);

    // Console: class java.util.LinkedHashSet
    System.out.println(convert.getClass());
    // Console: [1, 2, 3, 4]
    System.out.println(convert);
}
关注点:target 最终使用的是 LinkedHashSet 来存储,这结果和
CollectionFactory#createCollection该 API 的实现逻辑是相关(Set 类型默认创建的是 LinkedHashSet 实例)。不足:如果说它的优点是功能强大,能够处理复杂类型的转换(PropertyEditor 和前 2 个接口都只能转换单元素类型),那么缺点就是使用、自定义实现起来比较复杂。这不官方也给出了使用指导意见:在 Converter/ConverterFactory 接口能够满足条件的情况下,可不使用此接口就不使用。
底层转换器
按照添加转换器的顺序,Spring 在最后添加了 4 个通用的转换器用于兜底。
ObjectToObjectConverter
将源对象转换为目标类型,非常的通用:Object -> Object:
@Override
public Set<ConvertiblePair> getConvertibleTypes() {
	return Collections.singleton(new ConvertiblePair(Object.class, Object.class));
}
虽然它支持的是Object -> Object,看似没有限制但其实是有约定条件的:
@Override
public boolean matches(TypeDescriptor sourceType, TypeDescriptor targetType) {
	return (sourceType.getType() != targetType.getType() &&
			hasConversionMethodOrConstructor(targetType.getType(), sourceType.getType()));
}是否能够处理的判断逻辑在于hasConversionMethodOrConstructor方法,直译为:是否有转换方法或者构造器。
static boolean hasConversionMethodOrConstructor(Class<?> targetClass, Class<?> sourceClass) {
   return (getValidatedMember(targetClass, sourceClass) != null);
}

@Nullable
private static Member getValidatedMember(Class<?> targetClass, Class<?> sourceClass) {
   // 直接从缓存中取值,判断Member的可用性
   Member member = conversionMemberCache.get(targetClass);
   /**
    * 当不是首次进入处理时,会走快速返回流程。
    *  - Member包括Method或者Constructor
    *  - Method:若是static静态方法,要求方法的第1个入参类型必须是源类型sourceType;若不是static方法,则要求源类型sourceType必须是method.getDeclaringClass()的子类型/相同类型
    *  - Constructor:要求构造器的第1个入参类型必须是源类型sourceType
    */
   if (isApplicable(member, sourceClass)) {
      return member;
   }

   /**
    * 创建目标对象的实例,此转换器支持两种方式:
    * 1. 通过工厂方法/实例方法创建实例(method.invoke(source))
    * 2. 通过构造器创建实例(ctor.newInstance(source))
    */
   member = determineToMethod(targetClass, sourceClass);
   if (member == null) {
      member = determineFactoryMethod(targetClass, sourceClass);
      if (member == null) {
         member = determineFactoryConstructor(targetClass, sourceClass);
         if (member == null) {
            return null;
         }
      }
   }

   conversionMemberCache.put(targetClass, member);
   return member;
}
对于首次处理的转换,就会进入到三部曲逻辑:通过反射尝试找到合适的 Member 用于创建目标实例。
step1:determineToMethod,从sourceClass里找实例方法,对方法有如下要求:
- 方法名必须叫
"to" + targetClass.getSimpleName(),如toPerson() - 方法的访问权限必须是public
- 该方法的返回值必须是目标类型或其子类型
step2:determineFactoryMethod,找静态工厂方法,对方法有如下要求:
- 方法名必须为
valueOf(sourceClass)或者of(sourceClass)或者from(sourceClass) - 方法的访问权限必须是public
step3:determineFactoryConstructor,找构造器,对构造器有如下要求:
- 存在一个参数,且参数类型是 sourceClass 类型的构造器
- 构造器的访问权限必须是public
特别值得注意的是:此转换器不支持 Object.toString() 方法将 sourceType 转换为 java.lang.String。对于 toString() 支持,请使用下面介绍的更为兜底的 FallbackObjectToStringConverter。
ObjectToObjectConverter 实例方法示例
// sourceClass
@Data
public class Customer {
    private Long id;
    private String address;

    public Person toPerson() {
        Person person = new Person();
        person.setId(getId());
        person.setName("YourBatman-".concat(getAddress()));
        return person;
    }

}

// tartgetClass
@Data
public class Person {
    private Long id;
    private String name;
}
public static void main(String[] args) {
Customer customer = new Customer();
customer.setId(1L);
customer.setAddress("Peking");
// Converter方式
ConditionalGenericConverter converter = new ObjectToObjectConverter();
Object convert = converter.convert(customer, TypeDescriptor.forObject(customer), TypeDescriptor.valueOf(Person.class));
// Console: Person(id=1, name=YourBatman-Peking)
System.out.println(convert);
// ConversionService方式(实际使用方式)
ConversionService conversionService = new DefaultConversionService();
Person person = conversionService.convert(customer, Person.class);
// Console: Person(id=1, name=YourBatman-Peking)
System.out.println(person);
}IdToEntityConverter
Id(S) —> Entity(T)。通过调用静态查找方法将实体 ID 兑换为实体对象。Entity 里的该查找方法需要满足如下条件 find[EntityName]([IdType]):
- 必须是 static 静态方法
- 方法名必须为
find + entityName。如 Person 类的话,那么方法名叫findPerson - 方法参数列表必须为 1 个
- 返回值类型必须是 Entity 类型
说明:此方法可以不必是 public,但建议用 public。这样即使 JVM 的 Security 安全级别开启也能够正常访问
支持的转换Pair如下:ID 和 Entity 都可以是任意类型,能转换就成
@Override
public Set<ConvertiblePair> getConvertibleTypes() {
	return Collections.singleton(new ConvertiblePair(Object.class, Object.class));
}
判断是否能执行准换的条件是:存在符合条件的find方法,且 source可以转换为ID类型(注意 source 能转换成 ID 类型就成,并非目标类型哦)
@Override
public boolean matches(TypeDescriptor sourceType, TypeDescriptor targetType) {
	Method finder = getFinder(targetType.getType());
	return (finder != null
		&& this.conversionService.canConvert(sourceType, TypeDescriptor.valueOf(finder.getParameterTypes()[0])));
}根据ID定位到Entity实体对象简直太太太常用了,运用好此转换器的提供的能力,或许能让你事半功倍,大大减少重复代码,写出更优雅、更简洁、更易于维护的代码。
用法示例
Entity 实体:准备好符合条件的 findXXX 方法
@Data
public class Person {

    private Long id;
    private String name;

    /**
     * 根据ID定位一个Person实例
     */
    public static Person findPerson(Long id) {
        // 一般根据id从数据库查,本处通过new来模拟
        Person person = new Person();
        person.setId(id);
        person.setName("YourBatman-byFindPerson");
        return person;
    }

}
public static void main(String[] args) {
ConditionalGenericConverter converter = new IdToEntityConverter(new DefaultConversionService());
TypeDescriptor sourceTypeDesp = TypeDescriptor.valueOf(String.class);
TypeDescriptor targetTypeDesp = TypeDescriptor.valueOf(Person.class);
boolean matches = converter.matches(sourceTypeDesp, targetTypeDesp);
// Console: 是否能够转换:true
System.out.println("是否能够转换:" + matches);
// 执行转换
Object convert = converter.convert("1", sourceTypeDesp, targetTypeDesp);
// Console: Person(id=1, name=YourBatman-byFindPerson)
System.out.println(convert);
}使用场景
凡是需要使用到 findById() 的地方都可以通过它来代替掉。如:
Controller 层:
@GetMapping("/ids/{id}")
public Object getById(@PathVariable Person id) {
    return id;
}

@GetMapping("/ids")
public Object getById(@RequestParam Person id) {
    return id;
}
Tips:在 Controller 层这么写我并不建议,因为语义上没有对齐,势必在代码书写过程中带来一定的麻烦。
Service层:
@Autowired
private ConversionService conversionService;

public Object findById(String id){
    Person person = conversionService.convert(id, Person.class);

    return person;
}
Tips:在 Service 层这么写,用类型转换的领域设计思想代替了自上而下的过程编程思想。
FallbackObjectToStringConverter
通过简单的调用 Object#toString() 方法将任何支持的类型转换为String类型,它作为底层兜底。
@Override
public Set<ConvertiblePair> getConvertibleTypes() {
	return Collections.singleton(new ConvertiblePair(Object.class, String.class));
}
该转换器支持 CharSequence/StringWriter 等类型,以及所有 ObjectToObjectConverter.hasConversionMethodOrConstructor(sourceClass, String.class) 的类型。
说明:ObjectToObjectConverter 不处理任何 String 类型的转换都交给 FallbackObjectToStringConverter 处理
ObjectToOptionalConverter
将任意类型转换为一个 Optional<T> 类型。
代码示例
public static void main(String[] args) {
    ConversionService conversionService = new DefaultConversionService();
    Optional<Integer> result = conversionService.convert(Arrays.asList(2), Optional.class);
    // Console:Optional[[2]]
    System.out.println(result);
}
使用场景
一个典型的应用场景:在 Controller 中可传可不传的参数中,我们不仅可以通过 @RequestParam(required = false) Long id 来做,还是可以这么写:@RequestParam Optional<Long> id。
Converter Framework
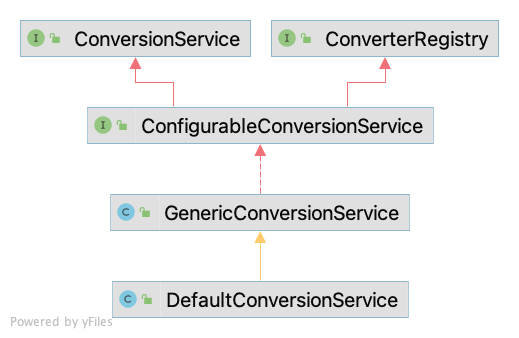
ConverterRegistry和ConversionService的关系密不可分,前者为后者提供转换器管理支撑,后者面向使用者提供服务。本文涉及到的接口/类有:
- ConverterRegistry:转换器注册中心。负责转换器的注册、删除
- ConversionService:统一的类型转换服务。属于面向开发者使用的门面接口
- ConfigurableConversionService:上两个接口的组合接口
- GenericConversionService:上个接口的实现,实现了注册管理、转换服务的几乎所有功能,是个实现类而非抽象类
- DefaultConversionService:继承自 GenericConversionService,在其基础上注册了一批默认转换器(Spring内建),从而具备基础转换能力,能解决日常绝大部分场景
ConverterRegistry
Spring 3.0 引入的转换器注册中心,用于管理新一套的转换器们。
public interface ConverterRegistry {

	void addConverter(Converter<?, ?> converter);
	<S, T> void addConverter(Class<S> sourceType, Class<T> targetType, Converter<? super S, ? extends T> converter);
	void addConverter(GenericConverter converter);
	void addConverterFactory(ConverterFactory<?, ?> factory);

	// 唯一移除方法:按照转换pair对来移除
	void removeConvertible(Class<?> sourceType, Class<?> targetType);
}
ConversionService
面向使用者的统一类型转换服务。
public interface ConversionService {

	boolean canConvert(Class<?> sourceType, Class<?> targetType);
	boolean canConvert(TypeDescriptor sourceType, TypeDescriptor targetType);

	<T> T convert(Object source, Class<T> targetType);
	Object convert(Object source, TypeDescriptor sourceType, TypeDescriptor targetType);
}
ConfigurableConversionService
ConversionService 和 ConverterRegistry 的组合接口,自己并未新增任何接口方法。
public interface ConfigurableConversionService extends ConversionService, ConverterRegistry {

}
GenericConversionService
对 ConfigurableConversionService 接口提供了完整实现的实现类。换句话说: ConversionService 和 ConverterRegistry 接口的功能均通过此类得到了实现,所以它是本文重点。
public class GenericConversionService implements ConfigurableConversionService {

	private final Converters converters = new Converters();
	private final Map<ConverterCacheKey, GenericConverter> converterCache = new ConcurrentReferenceHashMap<ConverterCacheKey, GenericConverter>(64);
}
它用两个成员变量来管理转换器们。converterCache 是缓存用于加速查找。Converters 是 GenericConversionService 的内部类,用于管理(添加、删除、查找)转换器们。也就说对 ConverterRegistry 接口的实现最终是委托给它去完成的,它是整个转换服务正常工作的内核。
DefaultConversionService
Spirng 容器默认使用的转换服务实现,继承自 GenericConversionService,在其基础行只做了一件事:构造时添加内建的默认转换器们。从而天然具备有了基本的类型转换能力,适用于不同的环境。如:XML 解析、@Value 解析、http 协议参数自动转换等等。
Tip:它并非Spring 3.0就有,而是Spring 3.1新推出的API
public class DefaultConversionService extends GenericConversionService {
	// 唯一构造器
	public DefaultConversionService() {
		addDefaultConverters(this);
	}
}
Spring 新一代类型转换内建了非常多的实现,这些在初始化阶段大都被默认注册进去。注册在 DefaultConversionService 提供的一个 static 静态工具方法里:
public static void addDefaultConverters(ConverterRegistry converterRegistry) {
  // 1、添加标量转换器(和数字相关)
  addScalarConverters(converterRegistry);
  // 2、添加处理集合的转换器
  addCollectionConverters(converterRegistry);

  // 3、添加对JSR310时间类型支持的转换器
  converterRegistry.addConverter(new ByteBufferConverter((ConversionService) converterRegistry));
  converterRegistry.addConverter(new StringToTimeZoneConverter());
  converterRegistry.addConverter(new ZoneIdToTimeZoneConverter());
  converterRegistry.addConverter(new ZonedDateTimeToCalendarConverter());

  // 4、添加底层转换器(上面处理不了的全转交它们处理)
  converterRegistry.addConverter(new ObjectToObjectConverter());
  converterRegistry.addConverter(new IdToEntityConverter((ConversionService) converterRegistry));
  converterRegistry.addConverter(new FallbackObjectToStringConverter());
  converterRegistry.addConverter(new ObjectToOptionalConverter((ConversionService) converterRegistry));
}
最后,需要特别强调的是:它是一个静态方法,并且还是 public 的访问权限,且不仅仅只有本类调用。实际上,DefaultConversionService 仅仅只做了这一件事,所以任何地方只要调用了该静态方法都能达到前者相同的效果,使用上可谓给与了较大的灵活性。比如 Spring Boot 环境下不是使用 DefaultConversionService 而是 ApplicationConversionService,后者是对 FormattingConversionService 扩展。Spring Boot 在 Web 环境默认向容器注册了一个 WebConversionService,因此你有需要可直接 @Autowired 使用。
ConversionServiceFactoryBean
顾名思义,它是用于产生 ConversionService 类型转换服务的工厂 Bean,为了方便和 Spring 容器整合而使用。
public class ConversionServiceFactoryBean implements FactoryBean<ConversionService>, InitializingBean {

	@Nullable
	private Set<?> converters;
	@Nullable
	private GenericConversionService conversionService;

	public void setConverters(Set<?> converters) {
		this.converters = converters;
	}
	@Override
	public void afterPropertiesSet() {
		// 使用的是默认实现,表示Spring标准实现都会被注册进容器
		this.conversionService = new DefaultConversionService();
		ConversionServiceFactory.registerConverters(this.converters, this.conversionService);
	}

	@Override
	@Nullable
	public ConversionService getObject() {
		return this.conversionService;
	}
	...
}
Formatter
格式化器的作用似乎跟转换器的作用类似,但是它们的关注点却不一样:
- 转换器:将类型 S 转换为类型 T,关注的是类型而非格式
- 格式化器: String <-> Java 类型。这么一看它似乎和 PropertyEditor 类似,但是它的关注点是字符串的格式
Spring 有自己的格式化器抽象 org.springframework.format.Formatter,但是谈到格式化器,必然就会联想起来 JDK 自己的 java.text.Format 体系。
JDK Formatter
JDK 内置有格式化器,便是java.text.Format体系。
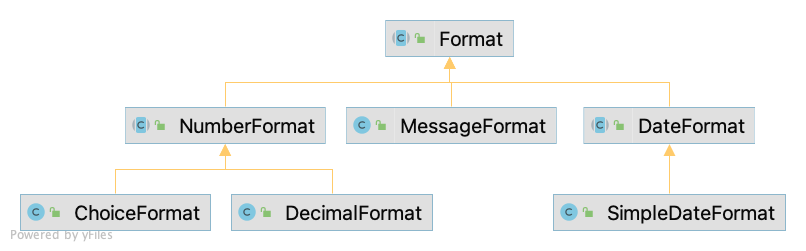
Format 提供了以下两个接口:
public abstract class Format implements Serializable, Cloneable {
    public abstract StringBuffer format(Object obj, StringBuffer toAppendTo, FieldPosition pos);
	public abstract Object parseObject (String source, ParsePosition pos);
}
DateFormat:日期时间格式化
抽象类。用于用于格式化日期/时间类型 java.util.Date。虽然是抽象类,但它提供了几个静态方法用于获取它的 Prototype 实例:
// 格式化日期 + 时间 示例:20-12-25 上午7:19
public final static DateFormat getInstance() {
    return getDateTimeInstance(SHORT, SHORT);
}
// 格式化日期 + 时间 示例:2020-12-25 7:19:30
public final static DateFormat getDateTimeInstance(int dateStyle, int timeStyle, Locale aLocale){
    return get(timeStyle, dateStyle, 3, aLocale);
}

// 格式化日期 示例:2020-12-25
public final static DateFormat getDateInstance(int style, Locale aLocale) {
    return get(0, style, 2, aLocale);
}

// 格式化时间 示例:7:19:30
public final static DateFormat getTimeInstance(int style, Locale aLocale){
    return get(style, 0, 1, aLocale);
}
NumberFormat:数字格式化
抽象类。用于格式化数字,它可以对数字进行任意格式化,如小数、百分数、十进制数等等。
DecimalFormat
以其主要实现 DecimalFormat 实现举例。DecimalFormat 用于格式化十进制数字。它具有各种特性,可以解析和格式化数字,包括:西方数字、阿拉伯数字和印度数字。它还支持不同种类的数字,包括:整数(123)、小数(123.4)、科学记数法(1.23E4)、百分数(12%)和货币金额($123)。所有这些都可以进行本地化。
NumberFormat.getInstance().format(1220.0455)); //1,220.045
NumberFormat.getCurrencyInstance().format(1220.0455)); //¥1,220.05
NumberFormat.getIntegerInstance().format(1220.0455));// 1,220
NumberFormat.getNumberInstance().format(1220.0455));// 1,220.045
NumberFormat.getPercentInstance().format(1220.0455));// 122,005%
DecimalFormat 构造器 pattern 模版
| 符号 | Localtion | 是否本地化 | 释义 |
|---|---|---|---|
0 |
Number | 是 | Digit |
# |
Number | 是 | Digit。若是0就显示为空 |
. |
Number | 是 | 小数/货币分隔符 |
- |
Number | 是 | 就代表减号 |
, |
Number | 是 | 分组分隔符 |
E |
Number | 是 | 科学计数法分隔符(位数和指数) |
% |
前/后缀 | 是 | 乘以100并显示为百分数 |
¤ |
前/后缀 | 否 | 货币记号。若连续出现两次就用国际货币符号代替 |
' |
前后缀 | 否 | 用于引用特殊字符。作用类似于转义字符 |
说明:Number 和 Digit 的区别:
- Number 是个抽象概念,其表达形式可以是数字、手势、声音等等。如 1024 就是个number
- Digit 是用来表达的单独符号。如 0-9 这是个 digit 就可以用来表示 number,如 1024 就是由 1、0、2、4 这四个 digit 组成的
0和#的用法
// 只保留整数部分 1220
new DecimalFormat("0").format(1220.0455);
// 保留3位小数 1220.045
new DecimalFormat("0.000").format(1220.0455);
// 整数部分、小数部分都5位。不够的都用0补位(整数高位部,小数低位补) 01220.04550
new DecimalFormat("00000.00000").format(1220.0455);
// 只保留整数部分 1220
new DecimalFormat("#").format(1220.0455);
// 保留两位小数并以百分比输出:122004.55%
new DecimalFormat("#.##%").format(1220.0455);
科学计数法E
// 1E3
new DecimalFormat("0E0").format(1220.0455);
// 1E03
new DecimalFormat("0E00").format(1220.0455);
// 12200E-00001
new DecimalFormat("00000E00000").format(1220.0455);
// .1E4
new DecimalFormat("#E0").format(1220.0455);
// .1E04
new DecimalFormat("#E00").format(1220.0455);
// 1220E00000
new DecimalFormat("#####E00000").format(1220.0455);
}
分组分隔符,
// 1,220
new DecimalFormat(",###").format(1220.0455);
// 12,20
new DecimalFormat(",##").format(1220.0455);
// 分隔符,左边是无效的 12,20
new DecimalFormat("###,##").format(1220.0455);
百分号%
// 百分位表示 122004.55%
new DecimalFormat("#.##%").format(1220.0455);
// 千分位表示 1220045.5‰
new DecimalFormat("#.##\u2030").format(1220.0455);
本地货币符号¤
// 1,220.05¥
new DecimalFormat(",000.00¤").format(1220.0455);
// 1,220.05¥
new DecimalFormat(",000.¤00").format(1220.0455);
//1,220.05¥¥
new DecimalFormat("¤,000.00").format(1220.0455);
// ¥1,220.05¥
new DecimalFormat("¤,000.¤00").format(1220.0455);
// 世界货币表达形式 1,220.05CNY
new DecimalFormat(",000.00¤¤").format(1220.0455);
ChoiceFormat
这个格式化器非常有意思:相当于以数字为键,字符串为值的键值对。使用一组 double 类型的数组作为键,一组 String 类型的数组作为值,两数组相同(不一定必须是相同,见示例)索引值的元素作为一对。
double[] limits = {1, 2, 3, 4, 5, 6, 7};
String[] formats = {"周一", "周二", "周三", "周四", "周五", "周六", "周天"};
NumberFormat numberFormat = new ChoiceFormat(limits, formats);

numberFormat.format(1); //周一
numberFormat.format(4.3); //周四
numberFormat.format(5.8); //周五
numberFormat.format(9.1); //周天
numberFormat.format(11); //周天
MessageFormat:字符串格式化
MessageFormat 提供了一种与语言无关(不管你在中国还是其它国家,效果一样)的方式生成拼接消息/拼接字符串的方法。使用它来构造显示给最终用户的消息。MessageFormat 接受一组对象,对它们进行格式化,然后在模式的适当位置插入格式化的字符串。
先来个最简单的使用示例体验一把:
String sourceStrPattern = "Hello {0}, my name is {1}";
Object[] args = new Object[]{"girl", "Elijah"};
// Console: Hello girl, my name is Elijah
String formatedStr = MessageFormat.format(sourceStrPattern, args);
参数模式
MessageFormat采用 {} 来标记需要被替换/插入的部分,其中 {} 里面的参数结构具有一定模式:{[ArgumentIndex],[FormatType],[FormatStyle]。
- ArgumentIndex:非必须。从0开始的索引值
- FormatType:非必须。使用不同的
java.text.Format实现类对入参进行格式化处理。它能有如下值:number(调用 NumberFormat 进行格式化)、date(调用 DateFormat 进行格式化)、time(调用 DateFormat 进行格式化)、choice(调用 ChoiceFormat 进行格式化) - FormatStyle:非必须。设置FormatType使用的样式。它能有如下值:short、medium、long、full、integer、currency、percent、SubformPattern(如日期格式、数字格式#.##等)
说明:FormatType 和 FormatStyle 只有在传入值为日期时间、数字、百分比等类型时才有可能需要设置,使用得并不多。
MessageFormat messageFormat = new MessageFormat("Hello, my name is {0}. I’am {1,number,#.##} years old. Today is {2,date,yyyy-MM-dd HH:mm:ss}");
// 亦可通过编程式 显示指定某个位置要使用的格式化器
// messageFormat.setFormatByArgumentIndex(1, new DecimalFormat("#.###"));

// Console: Hello, my name is YourBatman. I’am 24.12 years old. Today is 2020-12-26 15:24:28
messageFormat.format(new Object[]{"Elijah", 24.123456, new Date()});
与 String.format 对比
二者都能用于字符串拼接(格式化)上,撇开 MessageFormat 支持各种模式不说,我们只需要考虑它俩的性能上差异。
MessageFormat:模版可提前分析,且可以只分析一次,再在指定位置上插入相应的值
String.format:该静态方法是采用运行时用正则表达式匹配到占位符,然后执行替换的
Spring Formatter
在应用中,我们经常需要将 Client 端传入的字符串转换成指定格式/指定数据类型,同样的服务端也希望能把指定类型的数据按照指定格式返回给 Client 端,这种情况下 Converter 已经无法满足我们的需求了。为此,Spring 提供了格式化模块专门用于解决此类问题。
public interface Formatter<T> extends Printer<T>, Parser<T> {

}
可以看到,该接口本身没有任何方法,而是聚合了另外两个接口 Printer 和 Parser。
public interface Printer<T> {
  // 格式化显示(输出)接口。将 T 类型转为 String 形式,Locale 用于控制国际化。
	String print(T object, Locale locale);
}

public interface Parser<T> {
  // 解析接口。将 String 类型转到 T 类型,Locale 用于控制国际化。
	T parse(String text, Locale locale) throws ParseException;
}
根据继承树来看,格式化动作只需关心到两个领域:时间日期领域、数字领域(其中包括货币)。
时间日期格式化
Spring 框架从 4.0 开始支持 Java 8,针对 JSR 310 日期时间类型的格式化专门有个包 org.springframework.format.datetime.standard。Java 中对时间日期的格式化还需分为两大阵营来处理:java.util.Date 以及 JSR 310。
Date类型
Spring 提供了 DateFormatter 用于支持它的格式化。
因为 Date 早就存在,所以 DateFormatter 是伴随着 Formatter 的出现而出现,@since 3.0
public class DateFormatter implements Formatter<Date> {

	private static final TimeZone UTC = TimeZone.getTimeZone("UTC");
	private static final Map<ISO, String> ISO_PATTERNS;
	static {
		Map<ISO, String> formats = new EnumMap<>(ISO.class);
		formats.put(ISO.DATE, "yyyy-MM-dd");
		formats.put(ISO.TIME, "HH:mm:ss.SSSXXX");
		formats.put(ISO.DATE_TIME, "yyyy-MM-dd'T'HH:mm:ss.SSSXXX");
		ISO_PATTERNS = Collections.unmodifiableMap(formats);
	}
}
默认使用的 TimeZone 是 UTC 标准时区,ISO_PATTERNS 代表 ISO 标准模版,这和 @DateTimeFormat 注解的 ISO 属性是一一对应的。也就是说如果你不想指定 Pattern,可以快速通过指定 ISO 来实现。另外,不管输入还是输出,底层依赖的都是 JDK 的 java.text.DateFormat,万变不离其宗。
注意:ISO格式输出的时间,是存在时差问题的,因为它使用的是 UTC 时间,请稍加注意。
JSR 310类型
JSR 310日期时间类型是 Java8 引入的一套全新的时间日期 API。新的时间及日期 API 位于 java.time 中,此包中的是类是不可变且线程安全的。下面是一些关键类
- Instant——代表的是时间戳(另外可参考Clock类)
- LocalDate——日期,如 2020-12-12。
- LocalTime——时间,如 18:00:00。
- LocalDateTime——日期及时间(无时区)
- ZonedDateTime——日期及时间(有时区,以UTC/格林威治时间为基准)
- Timezone——时区。在新API中时区使用ZoneId来表示。时区可以很方便的使用静态方法of来获取到
同时还有一些辅助类,如:Year、Month、YearMonth、MonthDay、Duration、Period 等等。
从 Formatter 的继承树来看,Spring 只提供了一些辅助类的格式化器实现,如 MonthFormatter、PeriodFormatter、YearMonthFormatter 等,且实现方式都是趋同的:
class MonthFormatter implements Formatter<Month> {

	@Override
	public Month parse(String text, Locale locale) throws ParseException {
		return Month.valueOf(text.toUpperCase());
	}
	@Override
	public String print(Month object, Locale locale) {
		return object.toString();
	}

}
我们会发现,Spring 并没有为 LocalDateTime、LocalDate、LocalTime 提供 Formatter,是因为 JDK8 自身提供了 java.time.format.DateTimeFormatter 格式化器,Spring 只需要通过 Factory 等方式做整合即可。
以后对日期时间类型(包括 JSR310 类型)就不要自己去写原生的 SimpleDateFormat/DateTimeFormatter 了,建议可以用 Spring 包装过的 DateFormatter/DateTimeFormatterFactory ,使用体验更佳。
数字格式化
Spring 提供了 AbstractNumberFormatter 抽象来专门处理数字格式化议题。与 DateFormatter 的实现模式相同,底层实现委托给 java.text.NumberFormat 去完成。
此抽象类共有三个具体实现:
- NumberStyleFormatter:数字格式化,如小数,分组等
- PercentStyleFormatter:百分数格式化
- CurrencyStyleFormatter:钱币格式化
Formatter Framework
FormatterRegistry
FormatterRegistry 是格式化器注册中心。
public interface FormatterRegistry extends ConverterRegistry {
    void addPrinter(Printer<?> var1);

    void addParser(Parser<?> var1);

    void addFormatter(Formatter<?> var1);

    void addFormatterForFieldType(Class<?> var1, Formatter<?> var2);

    void addFormatterForFieldType(Class<?> var1, Printer<?> var2, Parser<?> var3);

    void addFormatterForFieldAnnotation(AnnotationFormatterFactory<? extends Annotation> var1);
}
此接口继承自类型转换器注册中心 ConverterRegistry,所以格式化注册中心是转换器注册中心的加强版。虽然 FormatterRegistry 提供了多种添加方法,但其实都是在描述同一个功能:为指定类型 FieldType 添加格式化器( Printer 或 Parser)。
说明:最后一个接口方法除外,
addFormatterForFieldAnnotation()和格式化注解相关,它非常重要。
FormatterRegistry 接口的继承树如下:
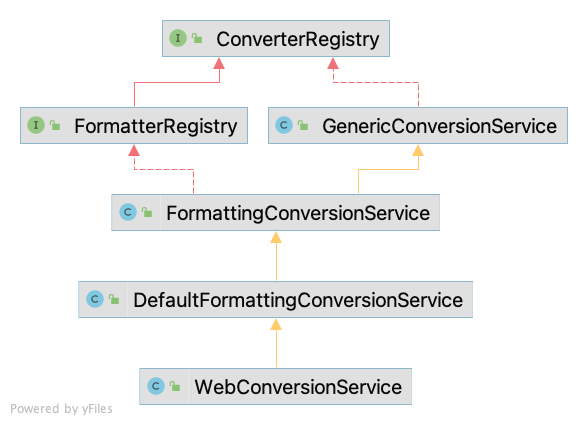
有了学过 ConverterRegistry 的经验,这种设计套路很容易被看穿。这两个实现类按层级进行分工:
- FormattingConversionService:实现所有接口方法
- DefaultFormattingConversionService:继承自上面的 FormattingConversionService,在其基础上注册默认的格式化器
FormattingConversionService
它是 FormatterRegistry 接口的实现类,实现其所有接口方法。
FormatterRegistry 是 ConverterRegistry 的子接口,而 ConverterRegistry 接口的所有方法均已由 GenericConversionService 全部实现了,所以可以通过继承它来间接完成 ConverterRegistry 接口方法的实现。
格式化器的注册管理远没有转换器那么复杂,因为它是基于上层适配的思想,最终适配为 Converter 来完成注册的。所以最终注册进去的实际是个经由格式化器适配来的转换器,完美复用了那套复杂的转换器管理逻辑。
PrinterConverter:Printer 接口适配器
把Printer<?>适配为转换器,转换目标为fieldType -> String。既然是转换器,重点当然是它的convert转换方法:
@Override
@SuppressWarnings("unchecked")
public Object convert(@Nullable Object source, TypeDescriptor sourceType, TypeDescriptor targetType) {
  // 若sourceType不是printerObjectType的子类型
  // 就尝试用conversionService转一下类型试试
  if (!sourceType.isAssignableTo(this.printerObjectType)) {
    source = this.conversionService.convert(source, sourceType, this.printerObjectType);
  }
  if (source == null) {
    return "";
  }

  return this.printer.print(source, LocaleContextHolder.getLocale());
}
这样主要是做一个中间态转换,假设我们想将 Entity 转换为 String,如果没有 Entity -> String 的转换器,就无法转换出期望的值。这时加一个中间层 ConversionService,我们就可以通过在 ConversionService 中注册的 Entity -> Integer 先转换一次,再将 Integer -> String(基础实现)完成相应的转换。
ParserConverter:Parser接口适配器
把Parser<?>适配为转换器,转换目标为 String -> fieldType。其设计思想和 PrinterConverter 相同。
addConverter()注册转换器时请务必不要使用lambda表达式代替输入,否则会失去泛型类型,导致出错。
对于 PrinterConverter 和 ParserConverter 来讲,它们的源目的是实现 String <-> Object,特点是:
- PrinterConverter:出口必须是 String 类型,入口类型也已确定,即
Printer<T>的泛型类型,只能处理T(或T的子类型) -> String - ParserConverter:入口必须是 String 类型,出口类型也已确定,即
Parser<T>的泛型类型,只能处理String -> T(或T的子类型)
按既定“规则”,它俩的能力范围还是蛮受限的。Spring 厉害的地方就在于此,可以巧妙的通过组合的方式,扩大现有组件的能力边界。比如本例中它就在 PrinterConverter/ParserConverter 里分别放入了 ConversionService 引用,从而到这样的效果:通过能力组合协作,起到串联作用,从而扩大输入/输出“范围”,感觉就像起到了放大镜的效果一样,这个设计还是很讨巧的。